
J2ME: Objects Serialization
Environment setup and project creation
The utility used to build our projects will be, of course, Maven 2.x [1]. To make it a little more sophisticated, we will use maven-antrun-plugin in the source generation phase (generate-sources). Ant's [2] responsibility will be to generate code using org.castor.anttask.CastorCodeGenTask class.
Before going further, I would like to recommend reading an excellent article about Maven that was published in the second issue of Java Express, Dec 2008 (Maven 2 – how to make work easier, pt I. Rafał Kotusiewicz).
Let us create two projects:
- CastorSourceGenerator
- CastorMsgFactoryME
They may be created either from the command line or by using an Eclipse plugin (M2 [3]). However, I strongly recommend using the following commands:
    mvn archetype:create -DgroupId=com.sonic.gen -DartifactId=CastorSourceGenerator
    mvn archetype:create -DgroupId=com.sonic.factory -DartifactId=CastorMsgFactoryME
Maven creates two directories named exactly as the values given in artifactId parameter. Both directories contain default project structure that includes some HelloWorld classes:
- src/main/java/com/sonic/gen/App.java
- src/test/java/com/sonic/gen/TestApp.java
and POM (Project Object Model) file whose sample content is shown in the listing 1:
    <project xmlns="http://maven.apache.org/POM/4.0.0"
            xmlns:xsi="http://www.w3.org/2001/XMLSchema-instance"
            xsi:schemaLocation="http://maven.apache.org/POM/4.0.0
                    http://maven.apache.org/maven-v4_0_0.xsd">
        <modelVersion>4.0.0</modelVersion>
        <groupId>com.sonic.factory</groupId>
        <artifactId>CastorMsgFactoryME</artifactId>
        <packaging>jar</packaging>
        <version>1.0-SNAPSHOT</version>
        <name>CastorMsgFactoryME</name>
        <url>http://maven.apache.org</url>
        <dependencies>
            <dependency>
                <groupId>junit</groupId>
                <artifactId>junit</artifactId>
                <version>3.8.1</version>
                <scope>test</scope>
            </dependency>
        </dependencies>
    </project>
Listing 1. Sample pom.xml
If you want to import templates as a project in Eclipse, then in each of the directories (CastorSourceGenerator, CastorMsgFactoryME, CastorTester), you should invoke the command:
mvn eclipse:eclipse
or
mvn idea:idea if you are using IntelliJ environment.
In the first case two files will be created: .project and .classpath. Also, a new target directory will be created and mvn-eclipse-cache.properties file in it.
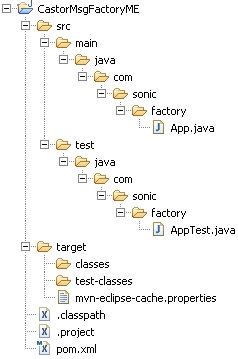
Picture 1. Projects structure in Eclipse 3.5M3
Having our templates imported as Java projects in Eclipse (File -> New -> Java Project... -> Create project from existing source), we should get project structure shown in the picture 1.
First of all, take a look at the CastorSourceGenerator project. Let us create MySourceGenerator class, that will control the default way in which the output code is generated. The fully qualified name of this class should be given as the value of org.exolab.castor.builder.jclassPrinterTypes attribute in the castorbuilder.properties file. The class should implement org.exolab.castor.builder.printing.JClassPrinter interface; you can find an example how to do it in org.exolab.castor.builder.printing.WriterJClassPrinter (see the listing 2). We will use WriterJClassPrinter class as a template for building our own implementation.
    package org.exolab.castor.builder.printing;

    import org.exolab.javasource.JClass;
    import org.exolab.javasource.JComment;

    public class WriterJClassPrinter implements JClassPrinter {
        public void printClass(final JClass jClass, final String outputDir,
                final String lineSeparator, final String header) {

            // hack for the moment
            // to avoid the compiler complaining with java.util.Date
            jClass.removeImport("org.exolab.castor.types.Date");

            // add header
            JComment comment = new JComment(JComment.HEADER_STYLE);
            comment.appendComment(header);
            jClass.setHeader(comment);

            // print
            jClass.print(outputDir, lineSeparator);
        }
    }
Listing 2. JClassPrinter implementation
Rename App.java file to MySourceGenerator.java, delete the unimportant stuff and add JclassPrinter implementation to this class. Most of the classes that we are going to use are located in org.exolab.javasource package and their names reflect very well their purposes. So, in order to create a method, create JMethod object. If you want to add parameter to an object, create JParameter object.
1. At this stage do not worry if the project is not compiling yet. It is time to download Castor sources (note that it must be version 1.2!) [4]. Now, go to the codegen directory (before that it would be a good idea to make a copy of this directory, e.g. codegen-me). We will change three files: Jtype.java, CollectionMemberAndAccessorFactory.java and SourceFactory.java.
Now, keeping in mind how signatures of serialization/deserialization methods look like:
    public void write(final java.io.DataOutputStream dos) throws java.io.IOException
    public void read(final java.io.DataInputStream dis) throws java.io.IOException
we should add the following declarations in org.exolab.javasource.JType class:
    /** JType instance for a void (void). */
    public static final JPrimitiveType VOID = new JPrimitiveType("void", "void");

     /** JType for a DataInputStream. */
    public static final JPrimitiveType DATA_INPUT_STREAM =
            new JPrimitiveType("java.io.DataInputStream", "java.io.DataInputStream");

    /** JType instance for a DataOutputStream. */
    public static final JPrimitiveType DATA_OUTPUT_STREAM =
            new JPrimitiveType("java.io.DataOutputStream", "java.io.DataOutputStream");
2. Find org.exolab.castor.builder.factory.CollectionMemberAndAccessorFactory class. What is particularly important is to remember the code that was generated for collections such as java.util.Vector and java.util.Hashtable should call only methods that in J2ME API [5]. Except for the public synchronized Object clone(); method, almost all methods from Java 1.1 [6] are included in CLDC 1.1 (JSR 139).
Also, you should make sure that the resulting output code contains calls only to methods from the following list:
    void addElement(Object obj)
    Object elementAt(int index)
    void insertElementAt(Object obj, int index)
    Enumeration elements()
    void removeAllElements()
    boolean removeElement(Object obj)
    void removeElementAt(int index)
    void setElementAt(Object obj, int index)
3.1 First change will be in the method:
    private void createGetAsArrayMethod(final CollectionInfo fieldInfo,
        final JClass jClass, final boolean useJava50,
        AnnotationBuilder[] annotationBuilders) { ... }
According to JSR 139 in the class java.util.Vector there is no such method as Object[] toArray() and Object[] toArray(Object[] a).
It means that we should either get rid of createGetAsArrayMethod(...) method body or look for:
    private void createGetAndSetMethods(final CollectionInfo fieldInfo,
        final JClass jClass, final boolean useJava50,
        final AnnotationBuilder[] annotationBuilders) { ... }
and remove the line:
this.createGetAsArrayMethod(fieldInfo, jClass, useJava50, annotationBuilders);
3.2 The same operation should be done in the following methods:
    private void createGetAsReferenceMethod(final CollectionInfo fieldInfo,
        final JClass jClass) { ... }

    private void createSetAsReferenceMethod(final CollectionInfo fieldInfo,
        final JClass jClass, final boolean useJava50) { ... }

    private void createSetAsCopyMethod(final CollectionInfo fieldInfo,
        final JClass jClass) { ... }
In my case all the implementations of these methods were removed and createGetAndSetMethods method looks now as shown below:
    private void createGetAndSetMethods(final CollectionInfo fieldInfo,
        final JClass jClass, final boolean useJava50,
        final AnnotationBuilder[] annotationBuilders) {
        this.createGetByIndexMethod(fieldInfo, jClass);
        this.createSetByIndexMethod(fieldInfo, jClass);
    }
3.3 The next change is done in:
    protected void createGetByIndexMethod(final CollectionInfo fieldInfo,
        final JClass jClass) { ... }
In the line:
String value = fieldInfo.getName() + ".get(index)";
the word get should be replaced with elementAt and this results in:
String value = fieldInfo.getName() + ".elementAt(index)";
So, what we did here was replacing Object get(int index); with Object elementAt(int index);
3.4 Now, look for the following method:
    protected void createAddByIndexMethod(final CollectionInfo fieldInfo,
        final JClass jClass) { ... )
The following piece of code:
    sourceCode.append(fieldInfo.getName());
    sourceCode.append(".add(index, ");
    sourceCode.append(fieldInfo.getContentType().
                    createToJavaObjectCode(parameter.getName()));
    sourceCode.append(");");
    void add(int index, Object element)
    should be replaced with this one:
    sourceCode.append(fieldInfo.getName());
    sourceCode.append(".insertElementAt(");
    sourceCode.append(fieldInfo.getContentType().
                    createToJavaObjectCode(parameter.getName()));
    sourceCode.append(", index);");
    void insertElementAt(Object obj, int index)
3.5 Remove the body of this method:
    protected void createIteratorMethod(final CollectionInfo fieldInfo,
        final JClass jClass, final boolean useJava50) { ... }
And the fragment of this method implementation:
    private void createRemoveAllMethod(final CollectionInfo fieldInfo,
        final JClass jClass) { ... }
    sourceCode.append(".clear();");
should be replaced wtih sourceCode.append(".removeAllElements();");
This means replacing void clear(); with void removeAllElements();
3.6 Replace the body of the method:
    protected void createRemoveByIndexMethod(final CollectionInfo fieldInfo,
            final JClass jClass) { ... }
Below there is the piece of code to be replaced:
    JMethod method = new JMethod("remove" + fieldInfo.getMethodSuffix() + "At",
        fieldInfo.getContentType().getJType(),
        "the element removed from the collection");
    method.addParameter(new JParameter(JType.INT, "index"));
    JSourceCode sourceCode = method.getSourceCode();
    sourceCode.add("java.lang.Object obj = this.");
    sourceCode.append(fieldInfo.getName());
    sourceCode.append(".remove(index);");
    if (fieldInfo.isBound()) this.createBoundPropertyCode(fieldInfo, sourceCode);

    sourceCode.add("return ");
    if (fieldInfo.getContentType().getType() == XSType.CLASS) {
        sourceCode.append("(");
        sourceCode.append(method.getReturnType().getName());
        sourceCode.append(") obj;");
    } else {
        sourceCode.append(fieldInfo.getContentType().createFromJavaObjectCode("obj"));
        sourceCode.append(";");
    }
    jClass.addMethod(method);
And here you can see how it should look after the operation:
    JMethod method = new JMethod("remove" + fieldInfo.getMethodSuffix() + "At",
        Jtype.VOID, "the element removed from the collection");
    method.addException(SGTypes.INDEX_OUT_OF_BOUNDS_EXCEPTION,
        "if the index given is outside the bounds of the collection");
    method.addParameter(new JParameter(JType.INT, "index"));
    JSourceCode sourceCode = method.getSourceCode();
    this.addIndexCheck(fieldInfo, sourceCode, method.getName());
    sourceCode.add("this.");
    sourceCode.append(fieldInfo.getName());
    sourceCode.append(".removeElementAt(index);");
    if (fieldInfo.isBound()) this.createBoundPropertyCode(fieldInfo, sourceCode);
    jClass.addMethod(method);
Briefly, all the calls to: Object remove(int index) are changed to calling:
    void removeElementAt(int index)
    And this.addIndexCheck(...)will add a short piece of code:
    // check bounds for index
    if (index < 0 || index >= this.VECTOR .size()) {
        throw new IndexOutOfBoundsException("getElement: Index value '" + index
                    + "' not in range [0.." + (this.VECTOR.size() - 1) + "]");
    }
3.7 The next replacement concerns the method:
    private void createRemoveObjectMethod(final CollectionInfo fieldInfo,
        final JClass jClass) { ... }
In its body we replace the line sourceCode.append(".remove("); with sourceCode.append(".removeElement(");
3.8 Remove the body of the method:
    private void createSetAsArrayMethod(final CollectionInfo fieldInfo,
        final JClass jClass, final boolean useJava50) { ... }
3.9 The last change should be done in the method:
    protected void createSetByIndexMethod(final CollectionInfo fieldInfo,
        final JClass jClass) { ... }
In this method we change: Object set(int index, Object element) into: void setElementAt(Object obj, int index)
and the following code should be replaced:
    JMethod method = new JMethod("set" + fieldInfo.getMethodSuffix());
    method.addException(SGTypes.INDEX_OUT_OF_BOUNDS_EXCEPTION,
        "if the index given is outside the bounds of the collection");
    method.addParameter(new JParameter(JType.INT, "index"));
    method.addParameter(new Jparameter(fieldInfo.getContentType().getJType(), fieldInfo.getContentName()));
    JSourceCode sourceCode = method.getSourceCode();
    this.addIndexCheck(fieldInfo, sourceCode, method.getName());
    sourceCode.add("this.");
    sourceCode.append(fieldInfo.getName());
    sourceCode.append(".set(index, ");
    sourceCode.append(fieldInfo.getContentType().createToJavaObjectCode(fieldInfo.getContentName()));
    sourceCode.append(");");
    if (fieldInfo.isBound()) this.createBoundPropertyCode(fieldInfo, sourceCode);
    jClass.addMethod(method);
with:
    JMethod method = new JMethod("set" + fieldInfo.getMethodSuffix(), JType.VOID,
        "the element added to the collection");
    method.addException(SGTypes.INDEX_OUT_OF_BOUNDS_EXCEPTION,
        "if the index given is outside the bounds of the collection");
    method.addParameter(new JParameter(JType.INT, "index"));
    method.addParameter(new JParameter(fieldInfo.getContentType().getJType(),
    fieldInfo.getContentName()));
    JSourceCode sourceCode = method.getSourceCode();
    this.addIndexCheck(fieldInfo, sourceCode, method.getName());
    sourceCode.add("this.");
    sourceCode.append(fieldInfo.getName());
    sourceCode.append(".setElementAt(");
    sourceCode.append(fieldInfo.getContentType().createToJavaObjectCode(fieldInfo.getContentName()));
    sourceCode.append(", index);");
    if (fieldInfo.isBound()) this.createBoundPropertyCode(fieldInfo, sourceCode);
    jClass.addMethod(method);
3.10 Short explanation
The list of classes which can be used to generate source code can be found here:
http://www.castor.org/1.3/javadoc/org/exolab/javasource/package-summary.html
What we are now looking for is the org.exolab.castor.builder.factory.Sourcefactory class in which there should be private void initialize(final JClass jClass) { ... } method. The only thing to do is to comment out the following line in this method: jClass.addInterface("java.io.Serializable");
We are doing this since we do not want this interface to be added to each newly created class because, as I have already mentioned this, interface does not exist in Java ME. Instead of it, we will use something different: de.enough.polish.io.Externalizable
Huh, this was the last ‘replacement operation’!:)
Now, let us edit pom.xml file: change its artifact name to castor-codegen and add version element: <version>1.2.1</version>.
Then, we should invoke the command in the shell: mvn clean install.
The artifact should be installed in our local repository (in the directory M2_REPO/repository/org/codehaus/castor/castor-codegen/1.2.1/) and it should be added as a dependency to the pom.xml:
    <dependency>
        <groupId>org.codehaus.castor</groupId>
        <artifactId>castor-codegen</artifactId>
        <version>1.2.1</version>
    </dependency>
If you have M2 plugin installed in Eclipse, simply click the right mouse button on the project and select Enable dependency management. In that way all the dependencies from pom.xml will appear in our classpath (Picture 2).
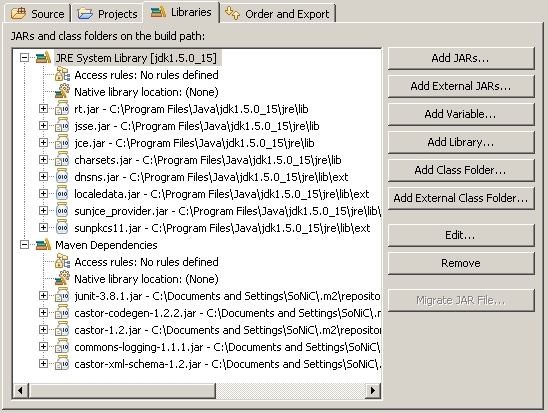
Picture 2. Java Build Path
The project should now compile successfully and it can be installed in your local repository:)
4. It is high time to implement the method:
    public void printClass(final JClass jClass, final String outputDir,
        final String lineSeparator, final String header) { ... }
which will add to the already generated class (JClass object) the additional code (the method) modifiedClass.addMethod(someMethod) and some comment: modifiedClass.setHeader(someComment)
The following code should be generated:
    public void read(DataInputStream dis) throws IOException {
        this.name = dis.readUTF();
        this.myObject2 = (MyObject2)de.enough.polish.io.Serializer.deserialize(dis);
    }
Step 1. Let us create a method signature:
    JMethod readMethod = new JMethod("read");
    JModifiers readMethodModifiers = new JModifiers();
    readMethodModifiers.makePublic();
    readMethod.setModifiers(readMethodModifiers);
    JParameter readMethoParameter = new JParameter(JType.DATA_INPUT_STREAM, "dis");
    readMethod.addParameter(readMethoParameter);
    readMethod.addException(new JClass("java.io.IOException"), "");
...I will leave it without a comment :)
Step 2. Create method body:
    JField[] fields = modifiedClass.getFields();
            if( fields.length > 0) {
                    for(JField field : fields) {
                            readSourceCode.append(returnProperReadMethod(field));
                            readSourceCode.append("\n");
                  }
                  readMethod.setSourceCode(readSourceCode.toString());
            } else {
                  readMethod.setSourceCode("super.read(dis);");
            }
...so we are iterating through all the fields in the class and creating the code :)
Sample implementation of the returnProperReadMethod(...) method may look like the one below:
    private String returnProperReadMethod(JField field) {
            final String name = field.getName();
            final String type = field.getType().getName();
            if(type.compareTo("java.lang.String") == 0) {
                    return "this." + name + " = dis.readUTF();";
            } else if(type.compareTo("int") == 0 || type.compareTo("java.lang.Integer") == 0) {
                    return "this." + name + " = dis.readInt();";
            } else if(type.compareTo("boolean") == 0 || type.compareTo("java.lang.Boolean") == 0) {
                    return "this." + name + " = dis.readBoolean();";
            } else if(type.compareTo("java.util.Date") == 0) {
                    return "this." + name + " = new java.util.Date(dis.readLong());";
            } else if(type.compareTo("double") == 0 || type.compareTo("java.lang.Double") == 0) {
                    return "this." + name + " = dis.readDouble();";
            } else {
                    return "this." + name + " = (" + type+ ")Serializer.deserialize( dis );";
            }
    }
The code created in this way should be added to our class with the command: modifiedClass.addMethod(readMethod);
Please remember to import the necessary class: modifiedClass.addImport("de.enough.polish.io.Serializer") and about write(...) method implementation!!!
Time for a short quiz... Does the project compile? :) Well... take a closer look at the line:
for(JField field : fields)
Unfortunately, the compilation fails with the following error message:

Picture 3.
On the Maven website [7] we can read this:
"...The default source setting is 1.3 and the default target setting is 1.1, independently of the JDK you run Maven with..."
So, let us configure Maven Compile Plugin. In order to do that, we add the following section to pom.xml:
    <build>
        <plugins>
            <plugin>
                <groupId>org.apache.maven.plugins</groupId>
                <artifactId>maven-compiler-plugin</artifactId>
                <configuration>
                    <source>1.5</source>
                    <target>1.5</target>
                </configuration>
            </plugin>
        </plugins>
    </build>
Listing 3. Maven Compiler Plugin configuration
It is also essential to remember about setting the correct parameters in castorbuilder.properties file:
    org.exolab.castor.builder.javaVersion=1.4
    org.exolab.castor.builder.jclassPrinterTypes=\
            com.sonic.gen.MySourceGenerator,\
            org.exolab.castor.builder.printing.TemplateJClassPrinter
Before we start testing our library, we need some test data. We should create a sample schema file and implement an automat which will generate valid code. So, let us do it:
Go to the CastorMsgFactoryME and create resources folder in which the element.xsd file should be put. Next, create types folder and place sub-element.xsd file in it (Picture 4). It is a very good idea to use XML Schema Editor in Eclipse [8] for editing schema files. The listings 4 and 5 present sample content of these files.
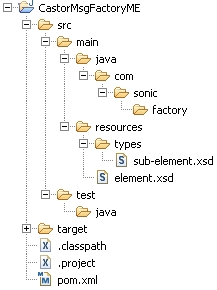
Picture 4. Project view in Eclipse 3.5M3
    <?xml version="1.0" encoding="UTF-8"?>
    <xsd:schema attributeFormDefault="unqualified"
        elementFormDefault="qualified"
        version="1.0"
        xmlns="http://com.sonic/element"
        xmlns:xsd="http://www.w3.org/2001/XMLSchema"
        xmlns:xmime="http://www.w3.org/2005/05/xmlmime"
        xmlns:es="http://com.sonic/types/complexTypes"
        targetNamespace="http://com.sonic/element">
      <xsd:import
        namespace="http://com.sonic/types/complexTypes"
        schemaLocation="types/sub-element.xsd"
      />
    <xsd:element name="MyElement">
      <xsd:complexType>
        <xsd:sequence>
          <xsd:element maxOccurs="unbounded"
            name="MySubElement"
            type="es:SubElementType" />
          </xsd:sequence>
          <xsd:attribute name="attr1" type="xsd:string"   />
          <xsd:attribute name="attr2" type="xsd:int"      />
          <xsd:attribute name="attr3" type="xsd:double" 	  />
          <xsd:attribute name="attr4" type="xsd:dateTime" />
        </xsd:complexType>
      </xsd:element>
    </xsd:schema>
Listing 4
    <?xml version="1.0" encoding="UTF-8"?>
    <xsd:schema	attributeFormDefault="unqualified"
        elementFormDefault="qualified"
        version="1.0"
        xmlns="http://com.sonic/types/complexTypes"
        xmlns:xsd="http://www.w3.org/2001/XMLSchema"
        xmlns:xmime="http://www.w3.org/2005/05/xmlmime"
        targetNamespace="http://com.sonic/types/complexTypes">
      <xsd:complexType name="SubElementType">
        <xsd:attribute name="attr1" type="xsd:int"    />
        <xsd:attribute name="attr2" type="xsd:double" />
        </xsd:complexType>
    </xsd:schema>
Listing 5
Now we are going to use org.castor.anttask.CastorCodeGenTask class. We create build.xml file. As a matter of fact, we can delete com/sonic/factory directories, as we are not going to need them. Files generation will be started by using Maven. In the generate-sources phase, we will run Ant task using maven-antrun-plugin plugin [9]. Sample configuration is shown in the listing 6.
    <plugin>
        <groupId>org.apache.maven.plugins</groupId>
        <artifactId>maven-antrun-plugin</artifactId>
        <version>1.3</version>
        <executions>
            <execution>
                <id>generate-me-sources</id>
                <phase>generate-sources</phase>
                <configuration>
                    <tasks>
                        <property name="compile_classpath" refid="maven.compile.classpath"/>
                        <ant antfile="build.xml" dir="${basedir}" />
                    </tasks>
                </configuration>
                <goals>
                    <goal>run</goal>
                </goals>
            </execution>
        </executions>
    </plugin>
Listing 6. Maven Antrun Plugin configuration
The compile_classpath property is actually the reference to Maven’s classpath and it will be used in build.xml file. The plugin will execute the default task in build.xml: <project name="CastorMsgfactoryME" default="castor:gen:src" basedir="."> This behaviour can be changed by defining <target name="nazwa"/> in <ant> section.
Code generation will be done by the defined task:
    <taskdef name="castor-srcgen"
        classname="org.castor.anttask.CastorCodeGenTask"
        classpathref="castor.class.path" />
... and called in this way:
    <castor-srcgen file="src/main/resources/element.xsd" todir="${src.dir}"
            package="${package.name}" warnings="true" nodesc="true"
    nomarshal="true"/>
where:
    <property name="package.name" value="com.sonic.dto"/>
    <property name="src.dir" value="src/main/java"/>
    <path id="castor.class.path">
    <path path="${compile_classpath}"/>
    </path>
By default, CastorCodeGenTask generates collections compatible with Java 1.1. If for some reason you would like to force compatibility with Java 1.2, then you should add attribute types and set its value to j2. The nomarshal attribute [10] is set to true, to inform generator not to generate methods for marshalling/unmarshalling.
Finally, the dependency graphs for both projects are shown in the pictures 5 and 6.
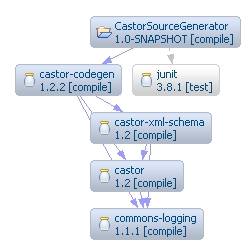
Picture 5. From Maven POM XML Editor

Picture 6. From Maven POM XML Editor
The artifacts enough-j2mepolish-client.jar, midp.jar and cldc.jar are placed in the /j2me-polish2.0.7/lib/ directory.
The example of how to install artifacts to the local repository:
    mvn install:install-file -DgroupId=javax.midp -DartifactId=midp -Dversion=2.0
            -Dpackaging=jar -Dfile=/path/to/file
Links
[3] http://m2eclipse.codehaus.org/
[4] http://dist.codehaus.org/castor/1.2/castor-1.2-src.zip
[5] http://java.sun.com/javame/reference/apis/jsr139/
[6] http://java.sun.com/products/archive/jdk/1.1/index.html
[7] http://maven.apache.org/plugins/maven-compiler-plugin/
[8] http://wiki.eclipse.org/index.php/Introduction_to_the_XSD_Editor
[9] http://maven.apache.org/plugins/maven-antrun-plugin/plugin-info.html
[10] http://www.castor.org/srcgen-anttask.html
Translation: Łukasz Baran


Nobody has commented it yet.